Drip Rail Fabrication

Collapse
X
 
  • Time
  • Show
Clear All
new posts
  • MP&C
    Registered Member
    • Dec 2013
    • 1309
    • 2017
    • Southern MD

    #1

    Drip Rail Fabrication

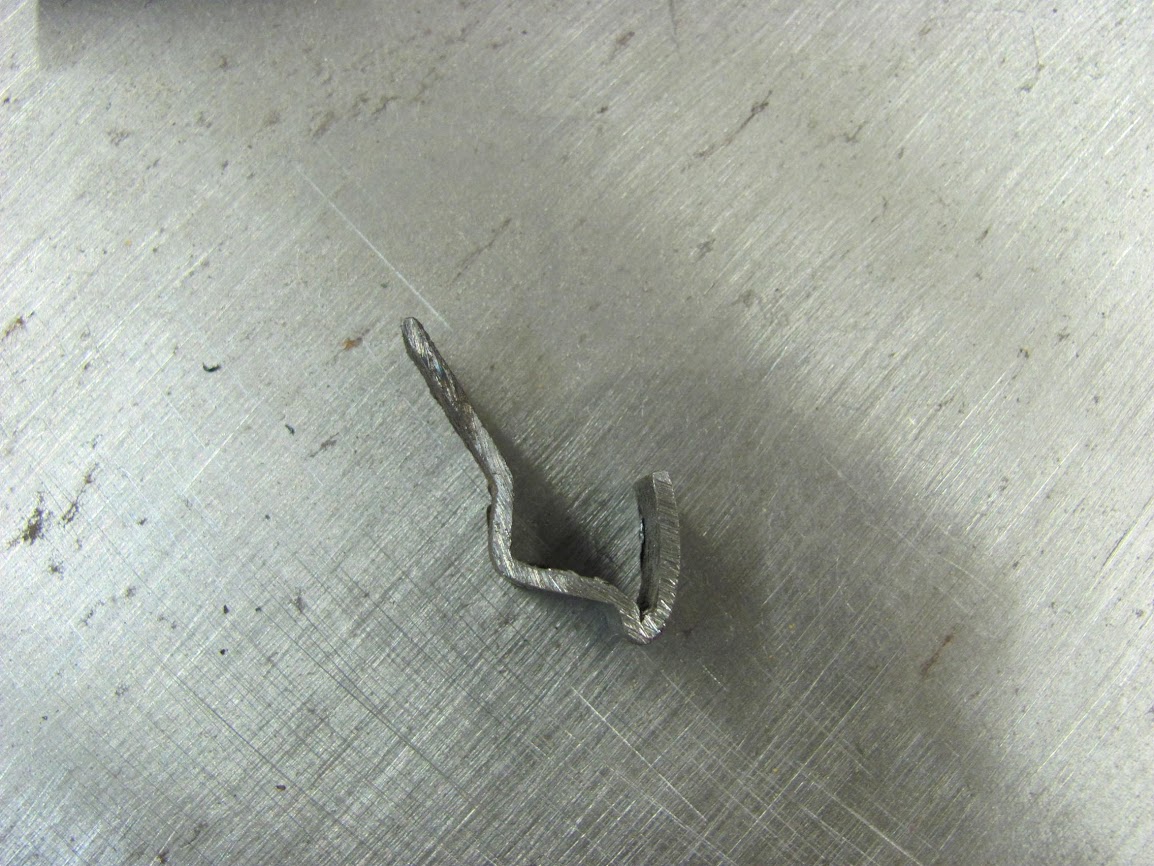
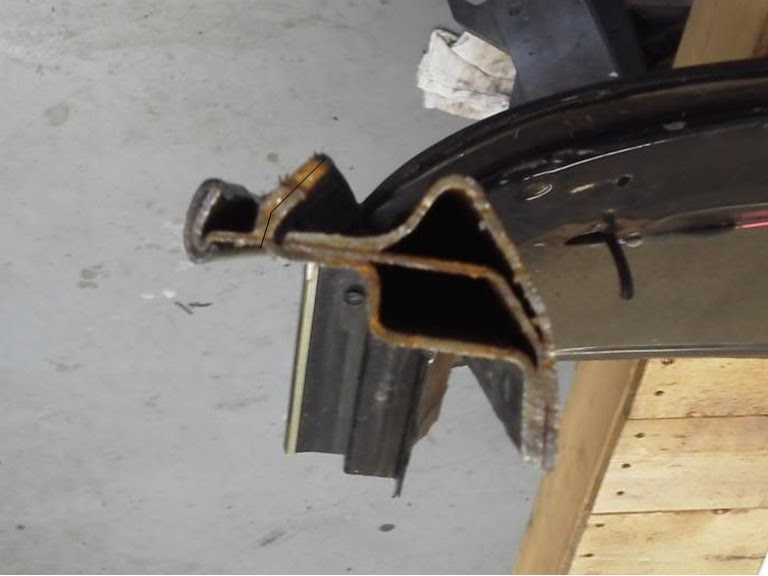
    Spent last week in Rock Hill SC for a metalshaping workshop. My project was going to be making a section of drip rail to match a section cut from a vehicle.. I was going to use the bead roller but any attempt showed distortion was difficult to control. Just to clarify where this is situated, this is welded along the outside of the A-pillar with the tail comprising part of the windshield opening.


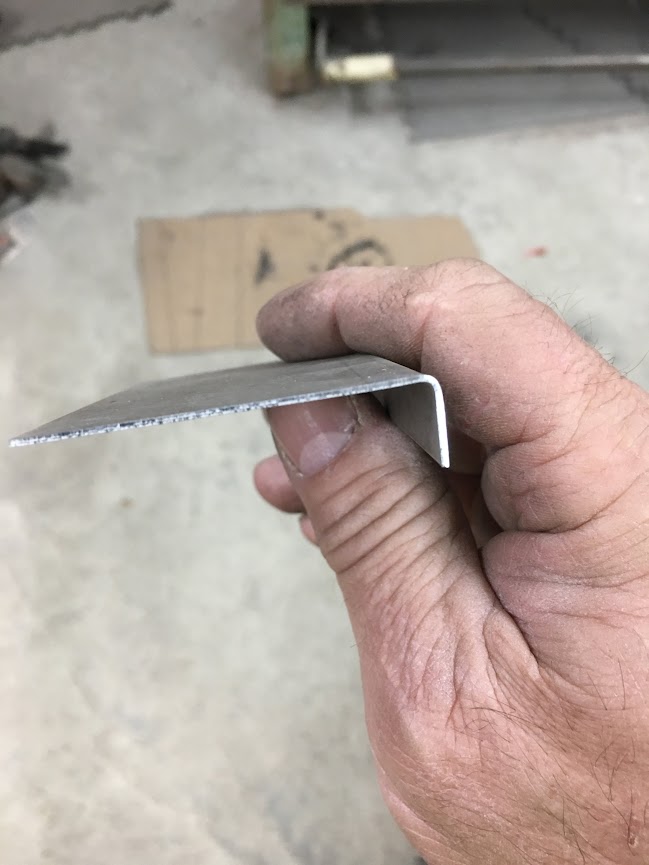
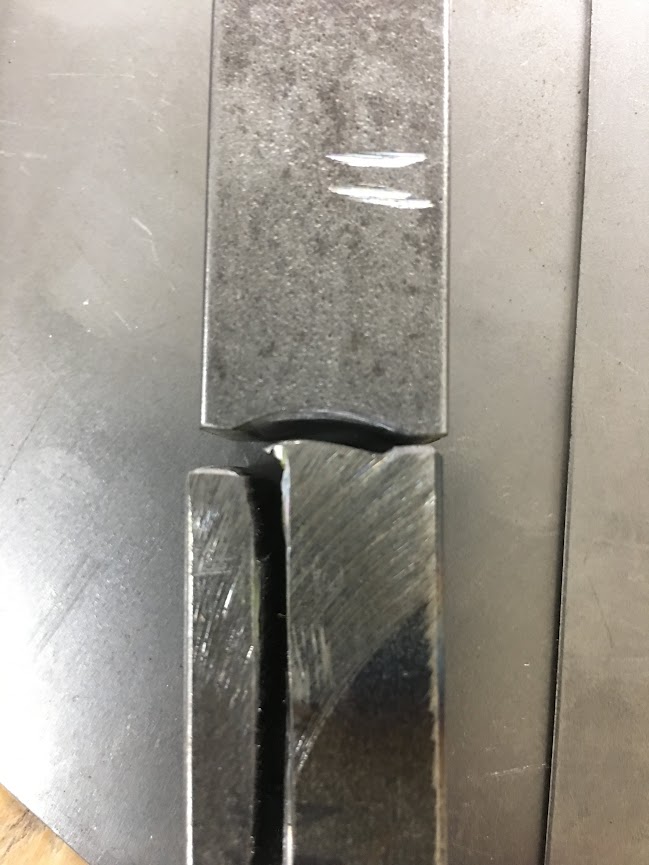
    After looking at some of the home made Pullmax dies others had brought, I think eliminating the deformity can be best addressed by making dies for the Lennox (Pullmax). Here's what we started with, a section of 18 gauge (to match OEM) and folded the lip that will form the outside face of the drip rail..


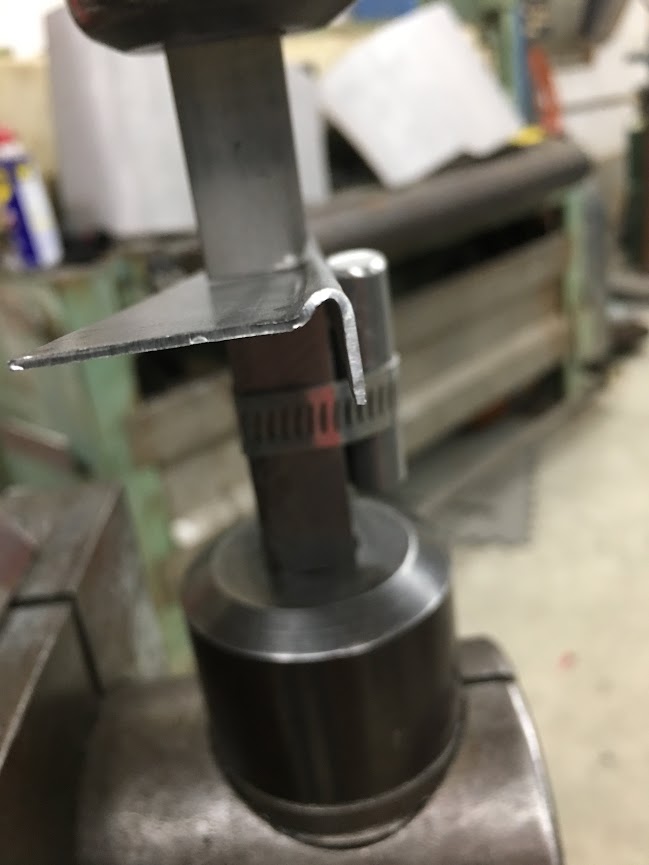
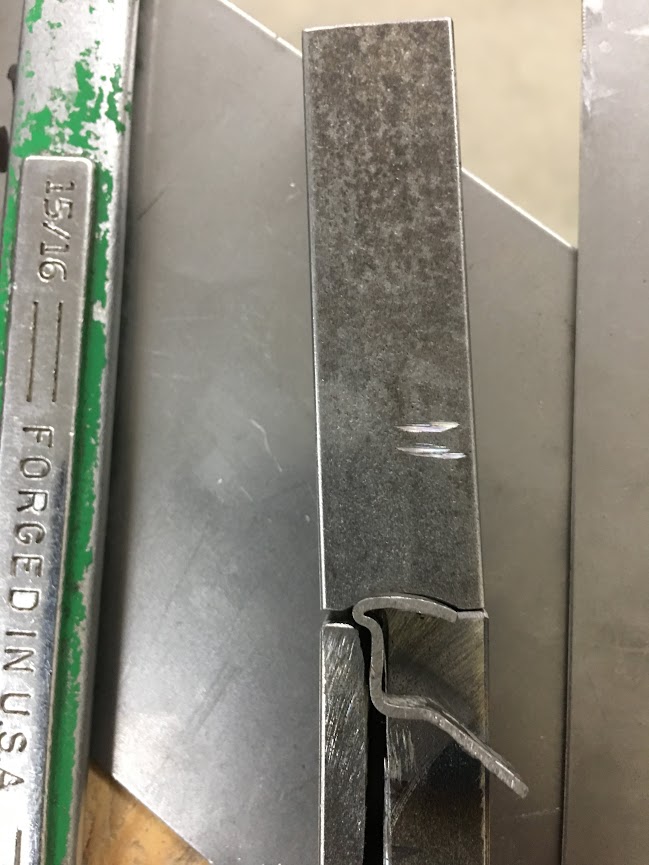
    Next, a die is used to add the joggle seen at the bottom, and a clamped-on guide prevents the flange from wanting to move skyward.


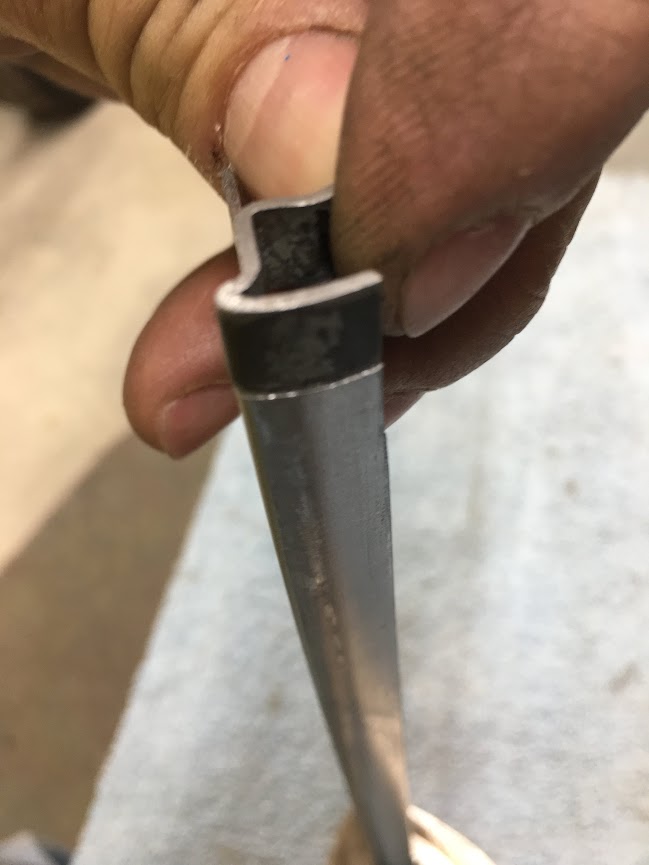
    Next operation is to add the slight bit of radius to the front face of the drip rail. Here's our die configuration for this step..


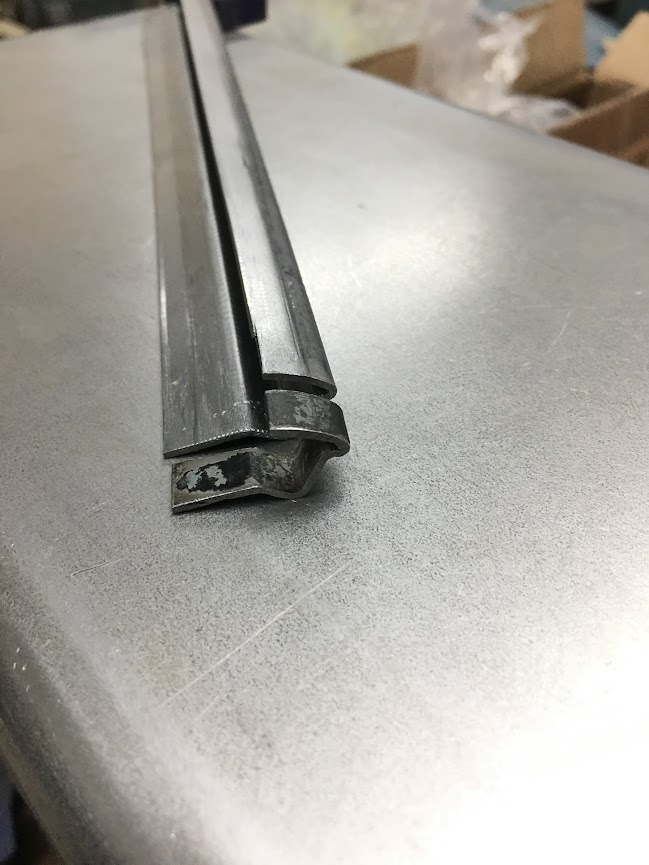
    Shown here with the original cross-section piece...

    Robert


    MP&C Shop Projects-Metalshaping Tutorials


    Instagram @ mccartney_paint_and_custom


    .
  • MP&C
    Registered Member
    • Dec 2013
    • 1309
    • 2017
    • Southern MD

    #2
    Our first task tonight was to modify die set #2 from last night so it would also tighten up the reverse joggle.


    Next, Die set #3 for adding the remaining folds. A partial bend is done in the magnetic brake, and then the die set forms them more accurately.

    Before:


    After....


    Comparison:


    I like this method much better, looks to be more easily repeatable with better consistency.
    Robert


    MP&C Shop Projects-Metalshaping Tutorials


    Instagram @ mccartney_paint_and_custom


    .

    Comment

    • Florida 57
      Registered Member
      • Jan 2018
      • 119
      • 3678

      #3
      Excellent work as usual Robert.Do I see a new supplier for drip rails in the future?

      Comment

      • MP&C
        Registered Member
        • Dec 2013
        • 1309
        • 2017
        • Southern MD

        #4
        Thanks, These are for FSJ Wagoneer, not as bad as the trifives drip rail as they are hemmed at the top edge. Fabrications like these are more time consuming than the market would probably bear with all the off shore stuff available. I've got a car show I plan on attending (if the rain stays away) this weekend with a display of metal fabrications and most I've done is now in primer. This does a good job showing fabrication of something different.
        Robert


        MP&C Shop Projects-Metalshaping Tutorials


        Instagram @ mccartney_paint_and_custom


        .

        Comment

        • bigblock
          Registered Member
          • Mar 2017
          • 285
          • 3360
          • Canton,Ohio

          #5
          Robert I wish you were here in Ohio, you are amazing to watch. Everything you have ever shown is better then new. Thanks for always sharing.

          Comment

          • NickP
            Registered Member
            • Mar 2012
            • 4158
            • 1653
            • De Queen, AR

            #6
            Super!

            Comment

            • carls 56 (RIP 11/24/2021)
              Registered Member
              • Jan 2011
              • 1857
              • 33
              • Culpeper, Va.

              #7
              thanks Robert.
              ARMY NAM VET, very proud!

              56 210 4dr

              drive and enjoy them while you work on them, life is to short.

              Comment

              • 55chevysedanX4
                Registered Member
                • Mar 2018
                • 42
                • 3732

                #8
                Amazing you are a master and i hope to learn more from you.

                Comment

                • 567chevys
                  Administrator
                  • Oct 2010
                  • 2538
                  • 3
                  • Woodland Washington

                  #9
                  Fantastic work Robert

                  You should Make a Video and sell them

                  Thanks for taking your time and posting on this site for all to see

                  Thanks Sid
                  sigpic
                  1955 2 DR Post
                  1937 Chevy Coupe
                  2023 Ford Super Duty F350 TREMOR
                  2019 Corvette Z06
                  1955 Chevy Nomad
                  1935 Ford 2dr Slant back I have 4

                  Comment

                  • Rick_L
                    Registered Member
                    • Apr 2012
                    • 4676
                    • 571

                    #10
                    Robert, that's awesome work.

                    Do you have to put a curve in the drip rail to fit it to the vehicle? How would you do that?

                    Comment

                    • NickP
                      Registered Member
                      • Mar 2012
                      • 4158
                      • 1653
                      • De Queen, AR

                      #11
                      Originally posted by Rick_L
                      Robert, that's awesome work.

                      Do you have to put a curve in the drip rail to fit it to the vehicle? How would you do that?
                      Shrinker maybe.

                      Comment

                      • MP&C
                        Registered Member
                        • Dec 2013
                        • 1309
                        • 2017
                        • Southern MD

                        #12
                        Originally posted by Rick_L
                        Robert, that's awesome work.

                        Do you have to put a curve in the drip rail to fit it to the vehicle? How would you do that?
                        If you let loose of it while pulling through the dies it flops around and does a nice vertical radius. Yes, experience. For where this is going I believe there is a miter cut at the top of the a pillar and then it has a straight run to the back. For horizontal curves I would imagine you might have to cut the blank with that radius already cut into it, and tip the flange. You can put a slight amount of radius in while pulling through the dies while forcing the direction desired. Not sure where the breaking point / kink point starts.


                        Thanks for the comments guys!
                        Last edited by MP&C; 04-13-2018, 07:14 PM.
                        Robert


                        MP&C Shop Projects-Metalshaping Tutorials


                        Instagram @ mccartney_paint_and_custom


                        .

                        Comment

                        Working...